Forecast Builder - Design Forecast Templates Article
This tool has three tabs:
- Define - create and manage forecast template using existing BudgetIDs;
- Preview - Preview template and push the preview result to the Import Budget Assumptions screen; and
- Update - Synchronize data for "Isforecast" BudgetIDs.
Expand Column Width functionality is available and is helpful in exposing the full name of items that are available for selection in pulldown menus. Copy and Paste is available too.

- Select the Company DB that to which you wish to add the Template;
- Click on the "Add New Template" button and the "Add New Forecast Template" message box will appear;
- Enter the name of the Template;
- Click the "Add New" button and the standard template will be generated as below.


8. To save the Template click "Save".
The checked "Form Enabled" box means that the Template's data can be previewed/searched for. Unchecking the box deactivates the Template's preview and search functions.
The Report Level should be set to "GLCode" only. The standard column format should be used as it mirrors that format on the Account Details tab; therefore please do not add columns.
To illustrate the options available for setting up Forecast columns the above template will be used as an example.
i) Column 2: The selection of "2014 Actuals", "Jan" and " Month" results in a display of January 2014 Actuals.
ii) Column 4: The selection of "2014 Actuals", "Feb" and "YTD" results in a display of the sum of January and February 2014 Actuals added together (Jan+Feb=Feb YTD).
iii) Column 5: The selection of "2014 Actuals", Feb" and "YTD-Avg" results in an the average of January and February 2014 Actuals ((Jan+Feb)/2 = Feb YTD-Avg)
iv) Column 7: The selection of "FY15", "Jun" and "Month" results in a display of FY15 Budget for June.

Cloning allows the copying and renaming of an existing Template which can then be edited. A Template can also be setup for a single company and then cloned/copied to multiple companies.
Cloning to a Single Company

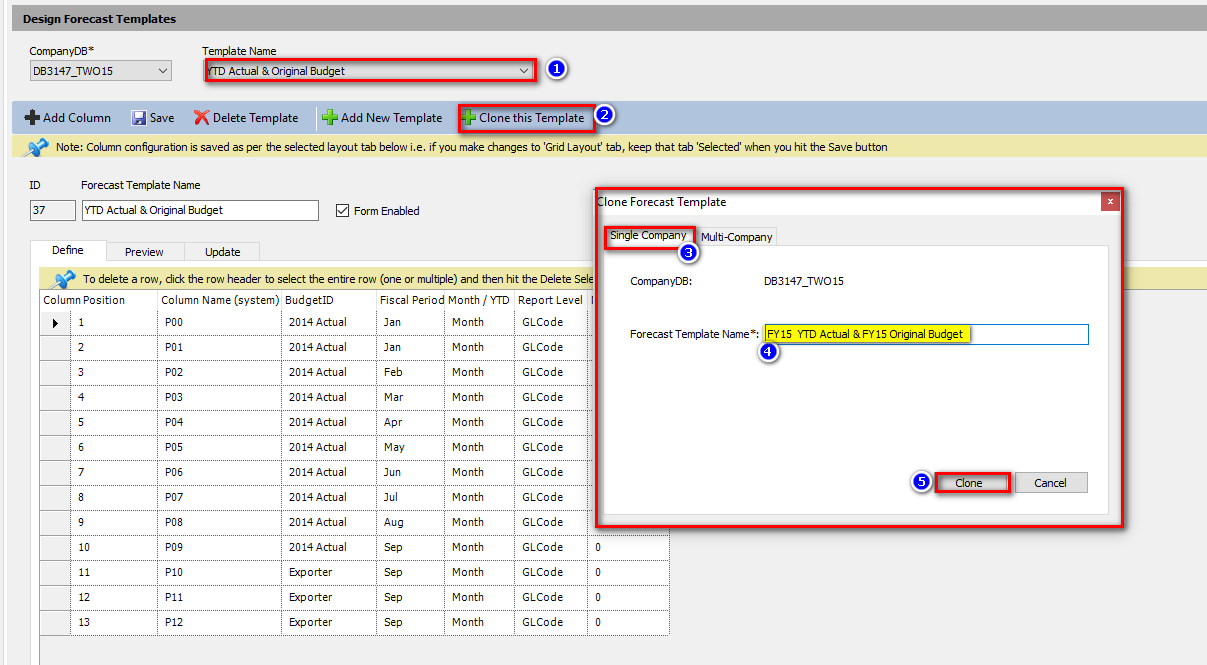
- From the dropdown menu, select the Template Name you wish to clone;
- Click the "Clone this Template" button which will be bring up the "Clone Forecast Template" box;
- Select "Single Company" tab. The CompanyDB will default to the Company DB for which the Template was originally setup;
- Enter the "Forecast Template Name";
- Click the "Clone" button to create the clone.
Cloning to Multi-Company

- From the dropdown menu select the "Template Name" you wish to clone;
- Click the "Clone this Template" button which will be bring up the "Clone Forecast Template" box;
- Select "Multi-Company" tab;
- Enter the "Form Name";
- Using Right and Left Pointing Arrows to Select/Deselect choose the "Company DB to Clone Form In";
- By checking this box same-named Templates, if they exist will be overwritten; and
- Click the "Save" button to create the Clones in the selected multiple companies.
C) Deleting a Template

- Select the Template you wish to delete;
- Click the "Delete Template" button which will bring up the Confirm message box;
- Click "Yes" to delete the Template.
D) Previewing and Pushing Results to Import Budget Assumptions Screen

Standard functionality is available including Print, Export to Excel, Print to PDF, Auto-fit Columns, Column Data Sort-Ascending/Descending, and Expand/Reduce Column Width.
The format of the on screen data can be customized by using the Display Level, Row Format, Show Rollup Sub-Totals and Expand/Collapse Rows functionality.
- Select the "Preview" tab;
- From the dropdown menu, select the "Template Name" you wish to preview;
- Search on the report criteria you wish to preview. The CompanyDB will pre-populate according to how the Template was setup. To review the full forecast, select <all> for all other search options.
- Please note that the Advanced search functionality is available.
- Once the Search results are displayed per below, the results can be pushed to the Import Budget Assumptions screen by clicking this button.
- When the "Push Results to Import Assumptions" button is clicked the below "Confirm" screen appears. Click "Yes" to continue and an "Import Budget Assumptions" tab is open with a time stamp. Please see below.

Below is what the screen looks like once search results are displayed:

Below is what the Import Budget Assumptions screen looks like when the results are pushed to the screen:


Related Articles
Forecast Builder - MultiCo Sync Article
This screen functionality is the same as Forecast Builder - Design Forecast Templates/Update tab except on this screen multiple CompanyDB can be synchronized at the same time provided the "Selected BudgetIDs" use the same Forecast Template. When a ...Manage Budgets Article
Tutorial Link Purpose: To provide tools to manage budgets such as budget list, budget creation, delete/purge budget, lock budgets/acct #s, link actual GP data & display setup, display budgetids, forecast setup, create historical avg for spreads. ...Importing a Forecast Tutorial
PDF Tutorials Interactive Tutorial Cropped Screenshots Full Page Screenshots Other Related Tutorials & Page Links: * Step by Step Tutorial-Import Assumptions * Knowledge Base Page Link-Import AssumptionsHow Do I Setup a Forecast Using Prior Year Actuals Increased by a Percentage? Article
The Forecast template you wish to use will need to have been setup and listed in Manage Budgets as will have the required account numbers. Please see the How Do I Create a Budget Using Prior Year Actuals Increased by a Percentage? article on how to ...BudgetID Article
This terms refers to either: Actual data for a given fiscal year that is imported in from Great Plains Accounting software (ERP); An Historic Budget that is imported; A budget that is setup in Dynamic Budgets; or A forecast that is setup in Dynamic ...